Sol's Graphics for Beginners
(ch05.cpp)
05 - Blending a Bit
(last revised 25. August 2005)
Exit the IDE, make a copy of ch03 or ch04 folder and rename it to ch05. Go to the ch05 folder and double-click on the project file to bring the IDE.
The routines presented in this chapter do not make the slightest attempt of being efficient. Faster ways of doing things that we'll be doing here exist, and most of them are very easy to implement. The way things are presented here should make them relatively easy to comprehend, however.
First, add #include <string.h> to the beginning of the file. We'll be needing memcpy in this one. Also add the following after the "SDL_Surface *screen" bit -
unsigned int *tempbuf;
Next, copy and paste the following after the PITCH macro..
unsigned int blend_avg(unsigned int source, unsigned int target)
{
  unsigned int sourcer = (source >>  0) & 0xff;
  unsigned int sourceg = (source >>  8) & 0xff;
  unsigned int sourceb = (source >> 16) & 0xff;
  unsigned int targetr = (target >>  0) & 0xff;
  unsigned int targetg = (target >>  8) & 0xff;
  unsigned int targetb = (target >> 16) & 0xff;

  targetr = (sourcer + targetr) / 2;
  targetg = (sourceg + targetg) / 2;
  targetb = (sourceb + targetb) / 2;

  return (targetr <<  0) |
         (targetg <<  8) |
         (targetb << 16);
}

unsigned int blend_mul(unsigned int source, unsigned int target)
{
  unsigned int sourcer = (source >>  0) & 0xff;
  unsigned int sourceg = (source >>  8) & 0xff;
  unsigned int sourceb = (source >> 16) & 0xff;
  unsigned int targetr = (target >>  0) & 0xff;
  unsigned int targetg = (target >>  8) & 0xff;
  unsigned int targetb = (target >> 16) & 0xff;

  targetr = (sourcer * targetr) >> 8;
  targetg = (sourceg * targetg) >> 8;
  targetb = (sourceb * targetb) >> 8;

  return (targetr <<  0) |
         (targetg <<  8) |
         (targetb << 16);
}

unsigned int blend_add(unsigned int source, unsigned int target)
{
  unsigned int sourcer = (source >>  0) & 0xff;
  unsigned int sourceg = (source >>  8) & 0xff;
  unsigned int sourceb = (source >> 16) & 0xff;
  unsigned int targetr = (target >>  0) & 0xff;
  unsigned int targetg = (target >>  8) & 0xff;
  unsigned int targetb = (target >> 16) & 0xff;

  targetr += sourcer;
  targetg += sourceg;
  targetb += sourceb;

  if (targetr > 0xff) targetr = 0xff;
  if (targetg > 0xff) targetg = 0xff;
  if (targetb > 0xff) targetb = 0xff;

  return (targetr <<  0) |
         (targetg <<  8) |
         (targetb << 16);
}

void scaleblit()
{
  int i, j, yofs;
  yofs = 0;
  for (i = 0; i < 480; i++)
  {
    for (j = 0; j < 640; j++)
    {
      int c = (int)((i * 0.95f) + 12) * 640 +
              (int)((j * 0.95f) + 16);
      ((unsigned int*)screen->pixels)[yofs + j] =
        blend_avg(((unsigned int*)screen->pixels)[yofs + j], tempbuf[c]);
    }
    yofs += PITCH;
  }
}
What we have here are three functions that take in two pixel values, do something with them, and return the result. More efficient ways of doing all of these three common blending operations exist.
The "avg" blend calculates the average of two pixel values. The operation is performed per color component. One cheaper way of doing this is to first use the bitwise AND operator to clear out the least significant bits of all of the color components, shift both colors right one bit, and then add them together. The average blend could be used, for instance, for transparent materials like stained glass.
The "mul" blend calculates the multiplication result of two pixel values. The operation is, again, performed per color component. The multiplication blend is typically used for shadows. If you multiply something by 1, you get the same value. Multiplying with a lower value gets you lower (and thus, darker) result. Note that full white (0xff, 255) isn't exactly '1' in this calculation, and thus you will always get slightly darker pixels when using this blend ((255*255)/256 = 254). (You may wish to dig up Jim Blinn's 'Dirty Pixels' if you're interested in solving this problem. It's way outside the scope of this tutorial, however).
The "add" blend calculates the sum result of two pixel values. The Additive blend again performs the operation for each color component separately. The color is guarded against overflow; ie. adding pixels together will eventually give you full white color. The additive blend is typically used for lighting effects such as glares, sparkles, explosions, lightsabers and laser weapons. Similar bit trickery can be used to speed up the additive operation, but on C-level there's little one can do to avoid the three comparisons to guard against overflow.
Let's look at the scaleblit a bit later on.
Next, replace the contents of the init() function with the following:
tempbuf = new unsigned int[640*480];
And it's time to replace the whole render() function again:
void render()
{
  // Lock surface if needed
  if (SDL_MUSTLOCK(screen))
    if (SDL_LockSurface(screen) < 0)
      return;

  // Ask SDL for the time in milliseconds
  int tick = SDL_GetTicks();

  int i, d;
  for (i = 0; i < 128; i++)
  {
    d = tick + i * 4;
    drawsprite((int)(320 + sin(d * 0.0034f) * sin(d * 0.0134f) * 300),
               (int)(240 + sin(d * 0.0033f) * sin(d * 0.0234f) * 220),
              ((int)(sin((tick * 0.2 + i) * 0.234897f) * 127 + 128) << 16) |
              ((int)(sin((tick * 0.2 + i) * 0.123489f) * 127 + 128) <<  8) |
              ((int)(sin((tick * 0.2 + i) * 0.312348f) * 127 + 128) <<  0));
  }

  for (i = 0; i < 480; i++)
    memcpy(tempbuf + i * 640,
           ((unsigned long*)screen->pixels) + i * PITCH,
           640 * 4);

  scaleblit();

  // Unlock if needed
    if (SDL_MUSTLOCK(screen))
        SDL_UnlockSurface(screen);

  // Tell SDL to update the whole screen
    SDL_UpdateRect(screen, 0, 0, 640, 480);
}
Here we're drawing the little colorful "worm" with drawsprite() again, but we're not clearing the screen before doing so. Afterwards, we copy the currently active image to the tempbuf array, and then we're calling scaleblit().
Now the program is ready for compile and run. Try it out.
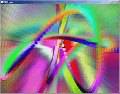
So what does the scaleblit do? In a very inefficient way, it takes 95% of the image, stretches it over the whole image, and blits it back, blending it with the "average" blend mode.
Note that the strength of the blur effect is very dependent on the speed of the machine it's run on, and there's also a difference in speed between debug and release builds.
Additional things to try:
- Replace the average blend with additive, or multiplicative blend. Also try without blending.
- If using multiplicative blend, add screen clearing in init() to fill the screen with some bright color, like white.
- Create sprite drawing routine that draws the sprites in additive mode. Comment out the memcpy and scaleblit, draw sprites additively, and make the colors dark (replace *127 + 128 with *12 + 12).
- Optimize the average blit.
- Try different zooming levels. Also, note that you can use different zooming level for horizontal and vertical pixels.
- Animate the zooming level with time.
- Using floating point calculation per pixel this way is rather expensive. Replace it with fixed-point calculation.
- Turn the average blend into a macro.
- Create 'average' blending calculator with which you can change the 'weight' of the blend, to make the sprite more or less transparent.
- Instead of our default sprite, try loading a small image and drawing it instead. Draw it with average blending.
As the last chapter of this this part of the tutorial, we'll look into 06 - Primitives and Clipping.
Having problems? Improvement ideas? Just want to discuss this tutorial? Try the forums!
Any comments etc. can be emailed to me.