Sol's Graphics for Beginners
(ch17.cpp)
17 - Variations on 2d Bitmap Tunnels
(last revised 9. August 2005)
Before continuing onwards with the game I'll take a small sidetrack and introduce four effects which we'll need in the game.
First up is the 2d bitmap tunnel.
Back in the good old days when a 8Mhz 286 was top of the line, the PCs had so little bandwidth to the video memory that it was almost, if not completely, impossible to fill the whole screen (all the 64000 bytes of it) fast enough to achieve anything resembling smooth movement. The most commonly used graphics mode had a palette - the 64000 bytes consisted of a 320x200 byte array, and each byte referred to a color in the palette.
When the video card was displaying the image, it read the pixel's palette index, and then read what color the pixel should be by 'looking it up' from the palette.
Palette lookup is just one example of lookup tables. Back then, lookup tables were everywhere. If you wanted to do some interesting stuff fast enough, you had better figure ways to precalculate values into lookup tables. Sine and cosine functions are a good example. CPUs also did not have floating point units (although you could buy external ones), and thus acquiring a simple sine value was a true 'sin' against a decent framerate.
One of the positive sides of the pre-486 architecture was the lack of cache. This 'feature' was not good in general, but it made lookup tables very efficient. With the introduction of CPU cache, some operations which were relatively expensive to do on the CPU (even with the new integrated floating point unit) became cheaper than precalculating the same values in lookup tables, since cache misses cost more than just doing the calculation real-time.
Anyway, one of the most impressive effects which relied on lookup tables were 2d bitmap tunnels. I think they would work nicely as the background effect for the ballgame.
First, a couple of downloads. Skeleton cpp file and texture (right-click, save as). Make a copy of some old project from earlier chapters, and replace the soure with the skeleton.
The skeleton doesn't offer anything new at this point. It creates a 480x320 window and that's about it.
First we'll define the lookup table. Add the following after the screen surface definition:
// Look-up table
unsigned short *gLut;
Next, we'll put this chunk of code into init():
gLut = new unsigned short[WIDTH * HEIGHT];

int i,j;
for (i = 0; i < HEIGHT; i++)
{
  for (j = 0; j < WIDTH; j++)
  {
    int xdist = j - (WIDTH / 2);
    int ydist = i - (HEIGHT / 2);

    int distance = (int)sqrt((float)(xdist * xdist + ydist * ydist));

    if (distance <= 0) distance = 1;

    distance = (64 * 256 / distance) & 0xff;

    int angle = (int)(((atan2((float)xdist, (float)ydist) / PI) + 1.0f) * 128);

    gLut[i * WIDTH + j] = (distance << 8) + angle;
  }
}
First we're allocating a screen-sized array of shorts (that is, 16 bit integers). Then we loop through every pixel.
For each pixel, we first calculate the horizontal and vertical distance from the center. Then, using the pythagoras' theorem (a*a+b*b=c*c), we calculate the linear distance to the center. As a little kludge, we're making sure there are no zero values.
Next, we're calculating "p*1/z" from the distance, creating perspective. You'll see how this works once we render the whole thing.
In the "p*1/z" formula, the 'p' (64 in our source) can be used to control the perspective. The '1' in our source is 256, which happens to be our texture size. If we were doing these calculations in floating point, the '1' might as well be '1', and we'd be multiplying the value with texture size later. The 'z' stands for the distance.
We're also using the binary 'and' operation to only use the bottom 8 bits, in practise limiting the values to [0..255].
Then we calculate the angle of the current pixel relative to the screen's center. The atan2() returns values in [-PI..PI] range, so by dividing by PI and adding one, we're at [0..2]. Further multiplying by 128 we're converting the result into [0..256] range (which will overflow a bit, but it won't matter).
Finally, we're storing the distance and angle in the lookup table, combining them into one 16-bit value.
Let's look at what the lookup data looks like. Find the 'rendering here' comment in render(), and paste the following after it:
int i, j;
for (i = 0; i < HEIGHT; i++)
{
  for (j = 0; j < WIDTH; j++)
  {
    int lut = gLut[(i) * WIDTH + j];
    ((unsigned int *)gScreen->pixels)[(j) + (i) * PITCH] = lut;
  }
}
Compile and run. The resulting image should be blue-greenish circley-thing, with green values depending on the distance from the center, and blue values depending on the angle around the center.
It might not look as much yet, but trust me, it gets better. Let's add the texture.
Add the texture surface (near the top)..
// Texture surface
SDL_Surface *gTexture;
..and load it at the beginning of the init() function (this should be familiar from 13 - Loading Images).
SDL_Surface *temp = SDL_LoadBMP("texture17.bmp");
gTexture = SDL_ConvertSurface(temp, gScreen->format, SDL_SWSURFACE);
SDL_FreeSurface(temp);
Next, we'll be completely replacing the rendering code we just pasted. Here's the new version:
if (SDL_MUSTLOCK(gTexture))
  if (SDL_LockSurface(gTexture) < 0)
    return;

int i, j;
for (i = 0; i < HEIGHT; i++)
{
  for (j = 0; j < WIDTH; j++)
  {
    int lut = gLut[(i) * WIDTH + j];
    ((unsigned int *)gScreen->pixels)[(j) + (i) * PITCH] =
      ((unsigned int*)gTexture->pixels)[(lut & 0xff) +
                                        ((lut >> 8) & 0xff) *
                                        (gTexture->pitch / 4)];
  }
}

if (SDL_MUSTLOCK(gTexture))
  SDL_UnlockSurface(gTexture);
The actual changes aren't huge, but it's easier to just paste over the old loop. First thing that you should notice are the locking and unlocking of the texture. The second difference is that instead of drawing the value of 'lut', we're using it to index the texture.
I'll go deeper into how we're reading the texture in a bit. Compile and run. Now it starts to look like something.
Let's animate it. Replace the texture reading line with this:
((unsigned int*)gTexture->pixels)[((lut + tick / 32) & 0xff) +
                                  (((lut >> 8) + tick / 8) & 0xff) *
                                  (gTexture->pitch / 4)];
Compile and run.
Okay, so how are we reading the texture? First, the bottom 8 bits of the lookup value stand for the angle, and the higher 8 bits contain the distance value. These are mapped to the texture's X and Y coordinates (or U and V, if you wish).
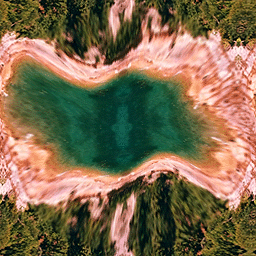
Our tunnel looks nice on the edges, but the center looks bad since the texture repeats there so often that it turns into noise. Let's mask the center smoothly out. First, go back to 'blending a bit' again, and copy-paste the 'blend_mul()' function to the current source (above the render() function).
Next, add this after the gLut variable definition:
// Distance mask
unsigned int *gMask;
Then, go to init(), and allocate memory for the mask (after the gLut allocation):
gMask = new unsigned int[WIDTH * HEIGHT];
Then, still inside 'init()', after the line where we make sure that 'distance' is never zero, add the following:
int d = distance;
if (d > 255) d = 255;
gMask[i * WIDTH + j] = d * 0x010101;
Here we're first clamping the maximum value to 255, and then we're storing the value to the mask, after multiplying the value with 0x010101, in effect filling R, G and B values with the same 8-bit value.
Next, in 'render', change the inner loop to look like this:
int lut = gLut[(i) * WIDTH + j];
int mask = gMask[(i) * WIDTH + j];

((unsigned int *)gScreen->pixels)[(j) + (i) * PITCH] =
  blend_mul(
  ((unsigned int*)gTexture->pixels)[((lut + tick / 32) & 0xff) +
                                    (((lut >> 8) + tick / 8) & 0xff) *
                                    (gTexture->pitch / 4)],
  mask);
First we're fetching the mask the same way as we're fetching the lookup value, and then we're using the blend_mul() function to blend the texture with the mask. Compile and run.
The tunnel now looks much nicer. Unfortunately the blending also slows things down considerably, especially if the rendered area is large.
Looking Around
Next we'll make the lookup table larger than the screen. Displaying only part of the tunnel creates an illusion of 'looking around', although we're only looking at the very same 2d bitmap tunnel.
Go to init(), and multiply the size of both of the tables by 4. Change the 'for' loops to double the size (HEIGHT * 2 and WIDTH * 2), and remove all the divisions-by-two where we're calculating distances from the center.
Finally, when writing to the gMask and gLut tables, multiply the WIDTH by two.
Now the lookup tables are four times as large as the screen. If you compile and run, you will find that things aren't quite like they should be yet, although the effect is pretty neat regardless.
To return to normality, go to the render() function, and like when we were writing to the tables, multiply WIDTH by two when reading from them. Compile and run.
You should be seeing a tunnel so that the center of the tunnel is in the bottom right corner. You may notice slight stuttering as well; this is normal. Remember that the tunnel consists of only 256 "pie slices", and thus on the edges the pixels start getting quite large.
Let's add a bit of movement. In render(), before the for-loops, add the following variables:
int posx = (int)((sin(tick * 0.000645234f) + 1) * WIDTH / 2);
int posy = (int)((sin(tick * 0.000445234f) + 1) * HEIGHT / 2);
Like before, the funny values (0.000645234f) were just hammered in at a more or less random. The exact values don't really matter. Different values will give you different orbits.
The gLut and gMask access lines change to this:
int lut = gLut[(i + posy) * WIDTH * 2 + j + posx];
int mask = gMask[(i + posy) * WIDTH * 2 + j + posx];
Now we're "looking around". In the game, the posx and posy values would depend on where the player is on the maze, creating a parallax effect.
Variations of the Theme
What else can we do with this effect? There are plenty of things to try. Let's start with a square tunnel. It's pretty easy to achieve. Go to init(), comment out the 'int distance...' line and paste this as a replacement:
int distance = (abs(xdist) > abs(ydist)) ? abs(xdist) : abs(ydist);
Compile and run. As you can see, the 'rotation' of the tunnel doesn't work all too well, but other than that, it works.
For a diamond-shaped tunnel, try this:
int distance = (abs(xdist) + abs(ydist)) / 2;
To distort the tunnel into 'flowerlike' shapes, add the following after the distance calculation:
distance += (int)(sin(atan2((float)xdist, (float)ydist) * 5) * 8);
Further things you could try include scaling the xdist and ydist values to make the tunnel wider or narrower. You can also interpolate between any of the above to make 'round square tunnels' and such.
Although we've had a lot of fun so far, there's still one more trick to go. Return the tunnel to its original, boring, round shape.
In addition to altering the way the lookup data is generated, we can also change the way we're reading the lookup data. Go to render(), and add a new pair of position values after the old ones:
int posx2 = (int)((sin(-tick * 0.000645234f) + 1) * WIDTH / 2);
int posy2 = (int)((sin(-tick * 0.000445234f) + 1) * HEIGHT / 2);
The coordinates don't really matter, as long as they're different from the first set.
Next, change the lookup table reading code:
int lut = gLut[(i + posy) * WIDTH * 2 + j + posx] -
          gLut[(i + posy2) * WIDTH * 2 + j + posx2];
int mask = gMask[(i + posy) * WIDTH * 2 + j + posx];
int mask2 = gMask[(i + posy2) * WIDTH * 2 + j + posx2];
Here we're fetching two values from the lookup table and subtracting the second from the first. It may be a bit complicated to figure out how it will look like, so the easiest way is to try it out.
One thing that we know is that there will be two 'center' points (at posx,posy and posx2,posy2), so we need to mask things out twice. Change the rendering code to:
((unsigned int *)gScreen->pixels)[(j) + (i) * PITCH] =
  blend_mul(
  blend_mul(
  ((unsigned int*)gTexture->pixels)[((lut + tick / 32) & 0xff) +
                                    (((lut >> 8) + tick / 8) & 0xff) *
                                    (gTexture->pitch / 4)],
  mask),
  mask2);
Here we first fetch a pixel from the texture, and multiply it with mask. Then we multiply the result with mask2. The result is then written to the screen buffer.
Compile and run.
You may notice - especially if you make the window considerably larger - that the effect eats a lot of CPU power. The reason for the slowdown is the blending. If you remove the blend_mul() function calls, and just plot the texture as is, the framerate will go way up.
So, now to fix that? I won't show you a fix here, but I'll give a couple of suggestions.
The first and the most obvious is to optimize the blend function. Since we're blending twice, it might be worthwhile to 'inline' the blending calculations and see if there are things that are done several times uselessly. (Since we know that our mask is greyscale, there definitely is). This will bring us some gains, but it will most likely still be rather slow.
The second is to precalculate the darker textures, and pick from a different map when needed. Doing so in a brute-force way will take a lot of memory, though (256*256*256*4 = 64MB). Instead, we could use mipmapping, where every further away copy of the texture is 1/4 size of the previous one (which will then only take 256*256*4 + 128*128*4 + 64*64*4 + 32*32*4 + 16*16*4 + 8*8*4 + 4*4*4 + 2*2*4 + 1*1*4 = 349524 bytes, i.e. 33% more than just a simple texture). Unfortunately, preparing the mipmaps and especially calculating which one we should use at which point may turn out to be rather complicated.
Third is to consider the fact that the .bmp textures we're using are not actually truecolor images, but have 256 unique colors. If we were to use the palette, and just precalculated the 256 different palettes, we would be using 256*256 + 256*256*4 = 327680 bytes, or 64kB more than we are now.
Additional things to try:
- Change the window resolution.
- Adjust 'perspective' by changing the 'p' value (64).
- Draw different kinds of textures. Try them out.
- What happens if you only use xdist as the distance? What's the difference to abs(xdist)?
- Add couple more tunnels, adding and substracting them.
- Create two different sets of lookup tables (like round and square) and add them together like we did in the last part.
- Animate between different tunnel shapes.
- Do the above by interpolating between two precalculated lookup tables.
- Implement the suggested optimizations for the blending.
- Create two sets of round lookup tables with different 'perspective', and render them on top of each other, using average blend. Make the "inner tube" move faster.
- Alternatively, instead of blending them together, mask some colors of the "inner tube" out completely, making them "windows" through which you can see the "outer tube".
- Add a bunch of sprites and turn the tunnel effect into a shoot-em-up game.
Next we'll be looking at faking lighting effects in 18 - Bumping Along..
Having problems? Improvement ideas? Just want to discuss this tutorial? Try the forums!
Any comments etc. can be emailed to me.