Sol's Graphics for Beginners
(ch02.cpp)
02 - SDL Skeleton and Putting Pixels
(last revised 8. August 2005)
Exit your development enviroment (visual studio, dev-c++, etc), make a copy of the ch01 folder and rename it to ch02. Go to the ch02 folder and double-click on the project file (gp.dsw for vc6, gp/gp.sln for vs.net2003, gp.dev for dev-c++) to bring up the IDE again.
If you're not into c++, don't worry, as I will mainly use C++ for its conveniently loosened variable placement rules. Some might argue that this is abuse of the language, but we're here just to play with pixels.
Open the main.cpp file if it's not open, and cut'n'paste the following to the file.
#include <stdlib.h>
#if defined(_MSC_VER)
#include "SDL.h"
#else
#include "SDL/SDL.h"
#endif

SDL_Surface *screen;

void render()
{
  // Lock surface if needed
  if (SDL_MUSTLOCK(screen))
    if (SDL_LockSurface(screen) < 0)
      return;

  // Ask SDL for the time in milliseconds
  int tick = SDL_GetTicks();

  // Declare a couple of variables
  int i, j, yofs, ofs;

  // Draw to screen
  yofs = 0;
  for (i = 0; i < 480; i++)
  {
    for (j = 0, ofs = yofs; j < 640; j++, ofs++)
    {
      ((unsigned int*)screen->pixels)[ofs] = i * i + j * j + tick;
    }
    yofs += screen->pitch / 4;
  }

  // Unlock if needed
  if (SDL_MUSTLOCK(screen))
    SDL_UnlockSurface(screen);

  // Tell SDL to update the whole screen
  SDL_UpdateRect(screen, 0, 0, 640, 480);
}


// Entry point
int main(int argc, char *argv[])
{
  // Initialize SDL's subsystems - in this case, only video.
  if ( SDL_Init(SDL_INIT_VIDEO) < 0 )
  {
    fprintf(stderr, "Unable to init SDL: %s\n", SDL_GetError());
    exit(1);
  }

  // Register SDL_Quit to be called at exit; makes sure things are
  // cleaned up when we quit.
  atexit(SDL_Quit);

  // Attempt to create a 640x480 window with 32bit pixels.
  screen = SDL_SetVideoMode(640, 480, 32, SDL_SWSURFACE);

  // If we fail, return error.
  if ( screen == NULL )
  {
    fprintf(stderr, "Unable to set 640x480 video: %s\n", SDL_GetError());
    exit(1);
  }

  // Main loop: loop forever.
  while (1)
  {
    // Render stuff
    render();

    // Poll for events, and handle the ones we care about.
    SDL_Event event;
    while (SDL_PollEvent(&event))
    {
      switch (event.type)
      {
      case SDL_KEYDOWN:
        break;
      case SDL_KEYUP:
        // If escape is pressed, return (and thus, quit)
        if (event.key.keysym.sym == SDLK_ESCAPE)
          return 0;
        break;
      case SDL_QUIT:
        return(0);
      }
    }
  }
  return 0;
}
Don't worry about the details yet. Compile and run the application (for VC/Visual Studio, do this by pressing F5. For Dev-C++, the hotkey is F9). Press ESC to quit the application. I know it's kind of hypnotic, but do try to resist.
Most of the things in the source code should be fairly easy to figure out. SDL has other things in it than graphics, and the graphics itself can be set up in different ways (for instance, we're creating a window here, while we might as well go fullscreen. Or use 16-bit pixels. etc). If you're curious, read the SDL documentation. For now, we'll concentrate on how the pixels are drawn to the window.
First off, the pixels are 32-bit "XRGB" pixels, meaning that there are 8 bits for red, green and blue, and the topmost 8 bits are ignored. This is a convenient pixel format since computers like round numbers like 32 (i.e. 25).
The "screen" buffer (pointed at by screen->pixels) is an array of data. There are three important values describing its size: width, height, and pitch.
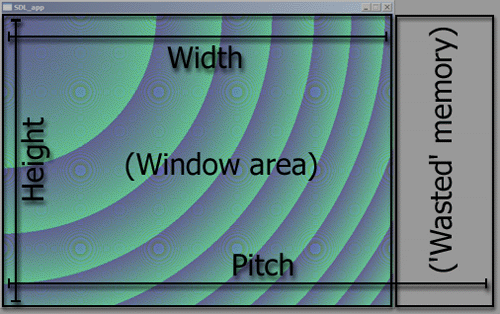
Width and height are the number of pixels that are visible. We already know what our width and height will be, since we were requesting a 640x480 pixel resolution.
Since our canvas (framebuffer, window, display - whatever you wish to call it) width is not a nice, round number such as 1024 (which is 210 - remember, computers like to think in binary), the video card may want to waste a bit more memory (the dark grey area in the picture above) to make the access to the important bits (i.e. the visible pixels) faster.
Thus, the pitch tells us how long a scanline is. The pitch is always at least as big as the width. Note that this doesn't have anything to do with the screen resolution (in our example, the desktop resolution might be 800x600, window is 640x480, and the 'virtual resolution' for the bitmap in the window could be 1024x480). Confused? Let's try this again.. by defining a "putpixel" routine.
First add the following function after the line that says "SDL_Surface *screen;"..
void putpixel(int x, int y, int color)
{
  unsigned int *ptr = (unsigned int*)screen->pixels;
  int lineoffset = y * (screen->pitch / 4);
  ptr[lineoffset + x] = color;
}
Next, add the following lines just before the line that says "// Unlock if needed":
putpixel(10, 10, 0xff0000);
putpixel(11, 10, 0xff0000);
putpixel(10, 11, 0xff0000);
putpixel(11, 11, 0xff0000);
If you compile and run, you should see a small red plot near the top left corner. That's what we just did.
So what's the putpixel made of? First, we're casting the pixel pointer to an unsigned int pointer. SDL does not define the pixel pointer as a unsigned int pointer by default, since you might wish to use pixels of some other size instead.
Next, we're calculating the line offset. We're dividing the pitch by 4; the pitch value is in bytes, but we're moving four bytes at a time.
Finally, we're using the pointer and the line offset value to change the color of a single pixel on the screen.
When we're using our putpixel function, we're setting the pixels to the value of 0xff0000, which is full red, no green or blue.
What the little routine with the two nested for-loops does is basically the same thing, in a bit more "optimal" manner. Each pixel is filled with the color which happens to be the result of (xx + yy + time). More on this later.
Note: if you notice that colors are somewhat strange, it is because the graphics mode you have has a different byte order than the ones used to write this tutorial. To fix things, you should swap the bytes in our pixels around - last should be first, etc. Other than that, things should work fine.
Additional things to try:
- Try changing the "i * i + j * j + tick" to something else and see what happens. Change a plus to a minus, add multipliers, remove multipliers.. or mix in some sin() and cos() functions. Go wild. As long as you're not dividing by zero, you should be ok, so there's little to be afraid of.
- We're animating the background using "tick". Can you animate the red dot? Be careful not to draw outside the screen though.
So great, now we can put pixels. What to do with them?
The first example shall be 03 - What Little Sprites Are Made Of.
Having problems? Improvement ideas? Just want to discuss this tutorial? Try the forums!
Any comments etc. can be emailed to me.