Sol's Graphics for Beginners
(ch03.cpp)
03 - What Little Sprites Are Made Of
(last revised 8. August 2005)
Exit the IDE, make a copy of the ch02 folder and rename it to ch03. Go to the ch03 folder and double-click on the project file to bring up the IDE.
The answer to the topic is, as you might have guessed, pixels.
Nobody who does serious graphics uses "putpixel"; it's simply too slow, especially if it is implemented as a function - the overhead that is caused by a simple function call can be quite severe when you're doing it millions of times per second (and you will - 640 * 480 * 50Hz is over 15 million). Additionally, typical putpixel routine also makes sure that you're not drawing out of bounds, which brings in additional overhead.
Thus, we're defining primitives that consist of more than one pixel a piece. Enter simple sprites.
First, add #include <math.h> to the beginning of the file. We'll need some standard math library functions soon.
Next, copy-paste the following under our 'putpixel' function. (We won't be using the putpixel anywhere, but it's handy to be around if you wish to debug something).
const unsigned char sprite[] =
{
0,0,0,0,0,1,1,1,1,1,0,0,0,0,0,0,
0,0,0,1,1,1,1,1,1,1,1,1,1,0,0,0,
0,0,1,1,1,1,1,1,1,1,1,1,1,1,0,0,
0,1,1,1,1,1,1,1,1,1,1,1,1,1,1,0,
0,1,1,1,1,1,1,1,1,1,1,1,1,1,1,0,
0,1,1,1,1,1,1,1,1,1,1,1,1,1,1,0,
1,1,1,1,1,1,1,1,1,1,1,1,1,1,1,1,
1,1,1,1,1,1,1,1,1,1,1,1,1,1,1,1,
1,1,1,1,1,1,1,1,1,1,1,1,1,1,1,1,
1,1,1,1,1,1,1,1,1,1,1,1,1,1,1,1,
0,1,1,1,1,1,1,1,1,1,1,1,1,1,1,0,
0,1,1,1,1,1,1,1,1,1,1,1,1,1,1,0,
0,1,1,1,1,1,1,1,1,1,1,1,1,1,1,0,
0,0,1,1,1,1,1,1,1,1,1,1,1,1,0,0,
0,0,0,1,1,1,1,1,1,1,1,1,1,0,0,0,
0,0,0,0,0,0,1,1,1,1,0,0,0,0,0,0
};

void drawsprite(int x, int y, unsigned int color)
{
  int i, j, c, yofs;
  yofs = y * (screen->pitch / 4) + x;
  for (i = 0, c = 0; i < 16; i++)
  {
    for (j = 0; j < 16; j++, c++)
    {
      if (sprite[c])
      {
        ((unsigned int*)screen->pixels)[yofs + j] = color;
      }
    }
    yofs += (screen->pitch / 4);
  }
}
The 'sprite' array defines 16 * 16 bytes of data. There's no actual reason why I chose this resolution. As you can see from the data, the ones define a kind of filled circle-ish form.
The drawsprite() function goes through the data, and, if the data is a non-zero value, it writes a pixel to the screen with the desired color.
Next, edit the "i * i + j * j + tick" - replace it with zero. If you compile and run, you should end up with a black screen. (Well, maybe you have a red dot near the top left corner, but that's optional).
Feel free to wipe out the putpixels if you have them, as we won't be needing the red dot.
After the background fill (which should now fill the screen with plain black color), around where the putpixels are (or were), add the following code:
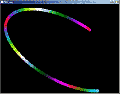
for (i = 0; i < 128; i++)
{
  drawsprite((int)(320 + sin((tick + i * 10) * 0.003459734f) * 300),
              (int)(240 + sin((tick + i * 10) * 0.003345973f) * 220),
            ((int)(sin((tick * 0.2f + i) * 0.234897f) * 127 + 128) << 16) |
            ((int)(sin((tick * 0.2f + i) * 0.123489f) * 127 + 128) <<  8) |
            ((int)(sin((tick * 0.2f + i) * 0.312348f) * 127 + 128) <<  0));
}
Compile and run. Whee!
Okay. What's happening here is that we're calling our new drawsprite function with some parameters that depend on time, and that causes the animation to happen.
The 'x' coordinate is based on the sin() of (tick + i * 10) multiplied by a more or less random value that's under 0.01. The result of the sin() function is between -1 and 1 inclusive. We multiply the sin() value by 300, so the result is -300 to 300 inclusive. This value is added to 320, so the final result will range from 20 to 620.
The value of 'y' is calculated in similar manner. Note that the range of the coordinates is chosen so that the sprite will always remain inside the screen. Writing outside the screen is a Bad Thing.
The color is calculated in a slightly more complicated manner, but not much. We're calculating a value for R, G and B separately, using a range from 1 to 255 for each component. These are then shifted to their correct positions (<< 16 for red, 8 for green, 0 for blue - shift by zero is, naturally, a "no operation", but it is included here just so that the code looks neat). The resulting values are combined with the bitwise or operator '|'.
Additional things to try:
- To create a circle, change the 'y' function to cos, and make the multipliers (the 0.003459734f ones) the same.
- Try diffrent amount of sprites (the 'i' variable range in the render function)
- Try different 'spacing' for the sprites (the * 10 multiplier for 'i' in 'x' and 'y' parameters for drawsprite)
- Since [-1..1] * [-1..1] = [-1..1], you can safely calculate sin()*sin() or even sin()*sin()*sin() etc. Add several sin() functions to both 'x' and 'y' parameters with different multipliers.
- Animate the 'spacing' of the sprites using time and sin() function.
- Modify the sprite. Draw an X instead of the circle.
- Change the sprite's size.
- Instead of just 0 and 1, add values of 2 and 3 to the sprite, and then draw those pixels with a different color.
- Load the sprite from an image file.
Next we'll implement an old but neat effect in 04 - Let it Snow
Having problems? Improvement ideas? Just want to discuss this tutorial? Try the forums!
Any comments etc. can be emailed to me.