tAAt 2014 new year demo breakdown writeup
Another year, another new year's demo.
Go ahead, watch the demo first. I'll wait.
Like I may have explained somewhere before, the process of these new year demos is to take an idea, and go with it, regardless of the result. Some are hits, others are misses. It also explains why they're all so different.
The idea this time started off from the thought that if lighting is additive (in general), why not use photographs as the source? Set up some scene, light it in different ways and take photos with the same camera settings, and later on compose them together. In this case "composing" really just means "add together"; as a side effect, I didn't need to use any shaders and the demo only requires OpenGL 1.2.
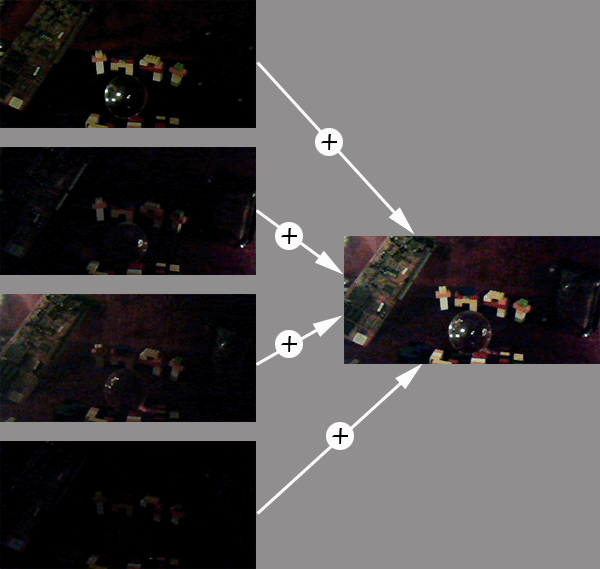
One nice side effect of this process is that nothing stops you from tinting the lights (especially if the lights are white to begin with) - just set the glColor to something else than (1,1,1). I did not end up using this feature in this demo, however.
Now, the only camera I had handy that lets me take stable photos with the same settings regardless of lighting conditions was a webcam (the other cameras in the house only have automatic settings that can't be disabled, plus they can't be remotely triggered so the camera would doubtlessly move), but I decided to take experimental photos anyway.
After an hour of playing around with a webcam stuck to a tripod with blu-tack I had some very crappy images, but still sufficient to do some testing. Turns out, the webcam's already crappy image quality gets even worse in dim lighting conditions...
But sure enough, the idea worked. I recruited McLad to take the photos for me, as he had some experience in such things, as well as the equipment. He went a bit overboard and built what you can see in the demo, instead of just dropping a few random objects to shoot (as I had done).
!Cube agreed to do the music and again hit it completely out of the park.
What was left to do was the actual demo..
The idea for the effect was basically (and honestly, this is how I described it to !Cube).. "aa-a-aa-a-a-I want the knife". If that wasn't funny, you werent a kid in the 80's. Sorry.
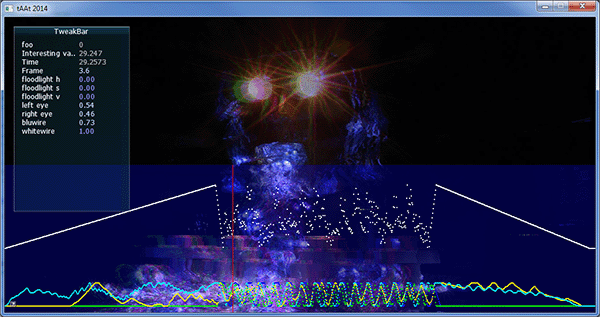
In the development mode shot above, you can see an AntTweakBar window showing (and letting me adjust) various variables, as well as an overlay rendering of the timeline curves. The keen-eyed will spot three variables for something called floodlight; there's another set of photos with an "overview" light which I considered using for brief flashes toned to various colors, but ended up not using it in the end; the scene works better without the viewer seeing all of the detail.
As for the curves, I originally went with catmull-rom, but ended up changing that to simple linear interpolation as the spline just ended up adding noise to my curves (the curves have control points every 0.05 seconds, so more smoothing wasn't really needed).
I spent quite a lot of time on setting up a production pipeline for such a small project. I considered going through my usual process of tinkering on timings by hand nearly forever, but for once went with a slightly different solution..
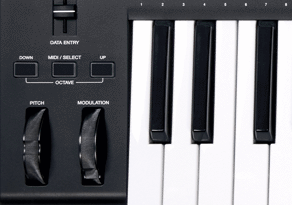
So yeah, I linked portmidi to the demo just so that I could record, in real time, the mod wheel positions from my midi keyboard. I "played" the various parameters (lights separately and the "camera position" as one parameter) live, re-recording each several times until I had something I could live with. In retrospect, adding capability for partial re-recordings would have been relatively simple to implement, and that would have saved me quite bit of effort in the end, but, oh well.
My original plan was to use 1024x512 resolution for the textures (and that is windowed mode size - just run the demo with any parameter for the windowed mode), but ended upping that to 2048x1024 since what's 400 megs of texture memory between friends? This made loading time quite long, though, so I added a loading "progress bar" and disbled mipmap generation. I also hunted for faster decoder code for stb_image jpg loader without success, but I guess it's good enough™ now..
And yes, the demo uses the aspect ratio of 2:1. The way my demo framework works is that the demo will always use your native desktop resolution, and adds black borders as necessary. So when you finally get to run this demo on a wider-than-2:1 aspect ratio screen, it'll know to add black borders on the sides.
Now the demo was all shaky and blinky, but it wasn't wub-wub enough, so I wrote some distortion effects.
To distort the image, I calculate a "velocity" value from the "camera position" parameter - basically how much it changes in 1/60th of a second, and then use that to distort the image.
The distortion has two different effects. First is that for the "eye" lights, the image is split to G and RB images and those are rendered separately, offset sideways based on the velocity value.
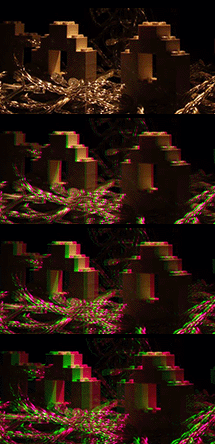
Second, and a bit harsher distortion is applied to all of the layers. The images are split into 50 horizontal stripes, and these get offset based on the velocity value; not directly, but so that the offset changes by a random value top-down; (i.e, x[n] = x[n-1] + rand(-1..1) * velocity) the distortion ends up being harsher at the bottom, and all over the place, since these values are randomized for each layer separately new values are generated for every frame.
If that didn't make sense, well, the result doesn't, much, either. But that's wub-wub for you. =)
All in all, it's a fairly simple demo, technically. I may want to explore the whole "photo-lighting" thing further later on. Maybe I'll end up getting a DSLR camera one of these years. Time will tell.
Comments, questions, etc. appreciated.