Interpolation Tricks
or How I Learned to Stop Worrying and Love the 0..1 Range
1. Why 0..1 Range
While making demos I've found different interpolation tricks to be extremely valuable. Adding little smoothness to all kinds of movement, be it actual movement of the camera, some object, fading of lights, fading in and out etc, makes things much more enjoyable to watch. Sharp movements and changes are jarring and should be avoided.
(Except, of course, if you want it. But in that case, you'd better get rid of all the other jarring movements, or your effect is ruined.)
Generally speaking, when making some kind of animation, we know the starting and ending positions, and want to transition between these. All of these can be converted to interpolation from 0 to 1.
(Similarly, any value between -1 and 1 multiplied with one with the same range results in a value between -1 and 1.)
Values between 0 and 1 have some rather interesting properties, including the fact that you can multiply any value between 0 and 1 with another value between 0 and 1, and the result is guaranteed to be between 0 and 1.
These properties can be used to tweak the way we move from 0 to 1 in various ways.
2. Getting to the 0..1 Range
Let's say we want to move the variable X between points A and B in N steps. This could be expressed by, for example:
for (i = 0; i < N; i++)
{
  X = ((A * i) + (B * (N - i))) / N;
}
Or, put another way, this becomes:
for (i = 0; i < N; i++)
{
  v = i / N;
  X = (A * v) + (B * (1 - v));
}
where v ranges from 0 to 1. (Or well, from 0 to (N-1)/N, but close enough, for large numbers of N).
3. Linear Interpolation
Moving from 0 to 1 in N discrete steps is called linear interpolation, or "lerp", for short:
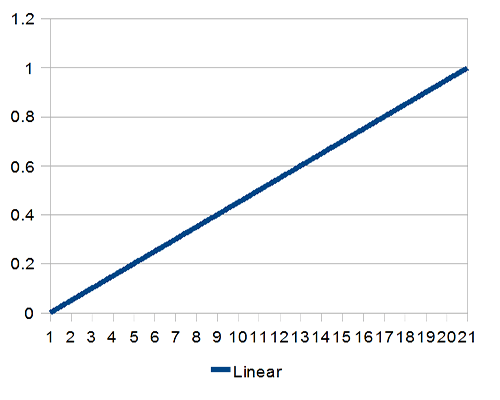
Relying on linear interpolation alone solves the basic problem of getting from point A to point B, but continuing the motion from there, thus moving from one interpolation to the next (or from motion to full stop) may seem jarring. Luckily, there's more than one way from A to B (actually infinite ways, but we'll concentrate on just a few).
4. Smoothstep
If there's nothing else you take away from this little tutorial, it's this:
#define SMOOTHSTEP(x) ((x) * (x) * (3 - 2 * (x)))
The smoothstep is the magic salt you can sprinkle over everything to make them better. You can replace most, if not all, of your linear interpolations with smoothstepped version of the same.
(ref: Texturing and Modelling, a Procedural Approach, Ebert et al, Second edition, Pages 26-27 - buy the book, it has plenty of cool stuff in it.)
It, simply put, rules:
for (i = 0; i < N; i++)
{
  v = i / N;
  v = SMOOTHSTEP(v);
  X = (A * v) + (B * (1 - v));
}
There's also "smootherstep" which may be an overkill.. or not.
#define SMOOTHERSTEP(x) ((x) * (x) * (x) * ((x) * ((x) * 6 - 15) + 10))
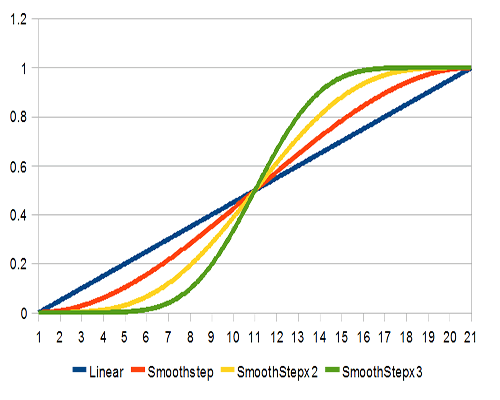
Smoothstep looks like this:
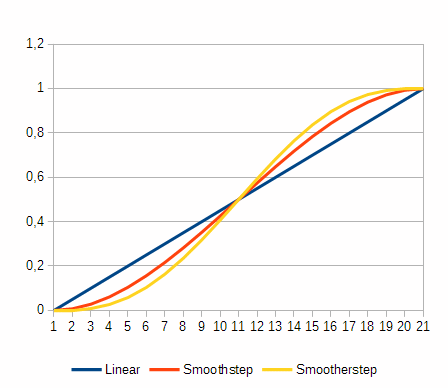
It takes a while to get up to speed, but also slows down before reaching the end.
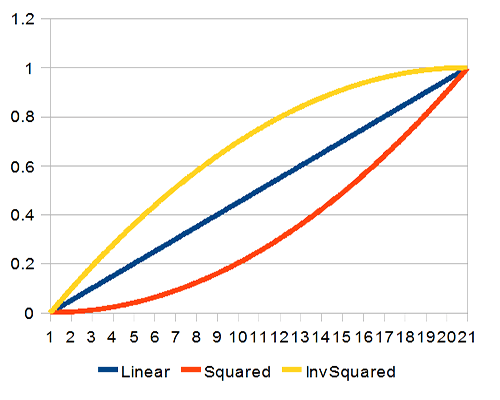
5. Higher Powers
There are, however, times when you just want to have slow acceleration. This is where simple powers come into play:
for (i = 0; i < N; i++)
{
  v = i / N;
  v = v * v;
  X = (A * v) + (B * (1 - v));
}
If you'd rather have some decelleration action, the above is easy to inverse:
for (i = 0; i < N; i++)
{
  v = i / N;
  v = 1 - (1 - v) * (1 - v);
  X = (A * v) + (B * (1 - v));
}
These look like this:
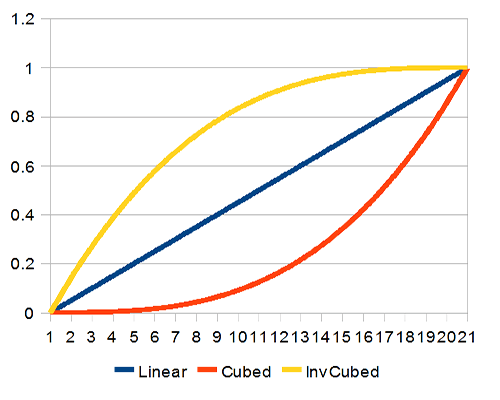
You can naturally rise the power. Cubed, the curves look like this:
The same idea can also be applied to smoothstep. Applying smoothstep to already smoothstepped value rounds the curve even further; the result is not as easily applied to everything, as you'll be standing still at the corners, but it can be useful sometimes:
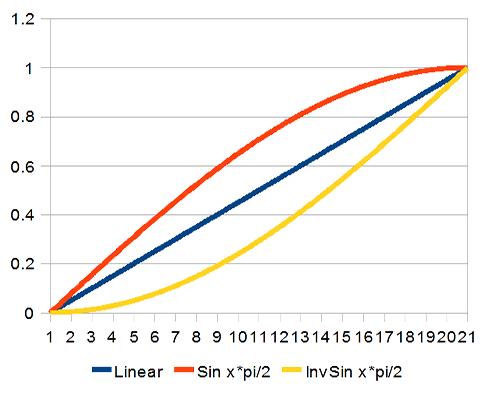
6. Sin
Another handy curve is sin(). Sin() can be applied just like a power, and the result is also similar.
for (i = 0; i < N; i++)
{
  v = i / N;
  v = sin(v * Pi / 2);
  X = (A * v) + (B * (1 - v));
}
This curve can also be inverted just like the higher powers. The results look like this:
If we use the whole curve, we get pretty close to smoothstep:
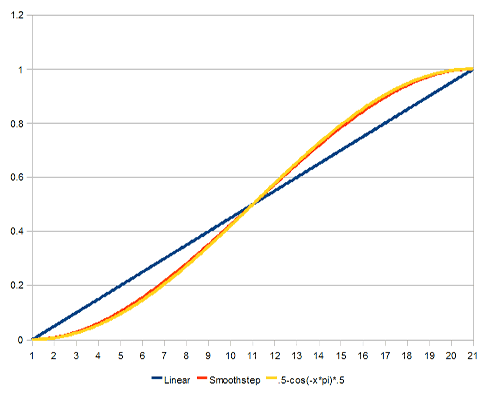
for (i = 0; i < N; i++)
{
  v = i / N;
  v = 0.5 - cos(-v * Pi) * 0.5;
  X = (A * v) + (B * (1 - v));
}
This is, however, usually more expensive than using smoothstep.
7. Weighted Average
One rather handy algorithm, especially when you don't necessarily know how the target will behave in the future (such as a camera tracking the player's character), is to apply weighted average to the value.
(Also known, in more general terms, as low pass filter. Handy in more places than you can imagine.)
v = ((v * (N - 1)) + w) / N;
where v is the current value, w is the value towards which we want to move, and N is the slowdown factor. The higher N, the slower v approaches w.
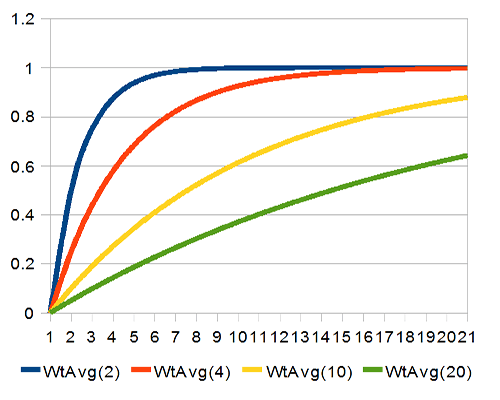
The closer v gets to w, the slower it moves; the further away they are, the faster v changes. In ideal world, v will never actually reach w, as the steps towards the goal get smaller and smaller. Then again, computers aren't ideal.
8. Splines
Finally, if you need more control, you can always use splines. Catmull-Rom spline is handy in the way that it always goes through the control points, and as such it can be easily applied to these interpolators. Other spline functions may give more natural curves, but are also less predictable. Here's an implementation of the Catmull-Rom interpolation function:
float catmullrom(float t, float p0, float p1, float p2, float p3)
{
return 0.5f * (
              (2 * p1) +
              (-p0 + p2) * t +
              (2 * p0 - 5 * p1 + 4 * p2 - p3) * t * t +
              (-p0 + 3 * p1 - 3 * p2 + p3) * t * t * t
              );
}

for (i = 0; i < N; i++)
{
  v = i / N;
  v = catmullrom(v, Q, 0, 1, T);
  X = (A * v) + (B * (1 - v));
}
In normal use, you'd have plenty of control points, and while interpolating between points 5 and 6, you'd feed the points 4 and 7 as the Q and T (or p0 and p3) parameters. Anyway, here we're using the function just to get different interpolations between 0 and 1, so the parameters are (Q, 0, 1, T). Here's a plot for some values:
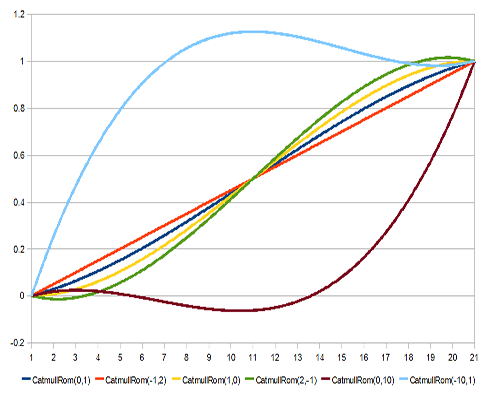
The parameter values in the plot are the Q and T (or p0 and p3) values.
Note that while the values do cross the 0 and 1 points, they do not necessarily stay between 0 and 1!
9. Conclusion
I hope the techniques outlined in this short tutorial help shave the sharpest corners off your movements. As always, comments are appreciated.
Further reading: