Sol's Graphics for Beginners
(ch04.cpp)
04 - Let it Snow
(last revised 5. July 2005)
Exit the IDE, make a copy of the ch03 folder and rename it to ch04. Go to the ch04 folder and double-click on the project file to bring up the IDE.
It actually doesn't matter whether you're starting from ch02 or ch03, as we'll be replacing the rendering code completely.
First, copy-paste the following before your render() function:
#define PITCH (screen->pitch / 4)

void init()
{
  int i, j, pos;
  for (i = 0; i < 640; i++)
  {
    int p = (int)((sin((i + 3247) * 0.02) * 0.3 +
                 sin((i + 2347) * 0.04) * 0.1 +
             sin((i + 4378) * 0.01) * 0.6) * 100 + 380);
    pos = p * PITCH + i;
    for (j = p; j < 480; j++)
    {
      ((unsigned int*)screen->pixels)[pos] = 0x007f00;
      pos += PITCH;
    }
  }
}

void newsnow()
{
  int i;
  for (i = 0; i < 8; i++)
    ((unsigned int*)screen->pixels)[rand() % 638 + 1] = 0xffffff;
}

void snowfall()
{
  int i, j;
  unsigned int *fb = (unsigned int*)screen->pixels;
  for (j = 478; j >= 0; j--)
  {
    int ypos = j * PITCH;
    for (i = 1; i < 639; i++)
    {
      if (fb[ypos + i] == 0xffffff)
      {
        if (fb[ypos + i + PITCH] == 0)
        {
          fb[ypos + i + PITCH] = 0xffffff;
          fb[ypos + i] = 0;
        }
      }
    }
  }
}
We're defining the PITCH as a macro since we're using it in so many places (and there are limits to the width of this web page =)
Before explaining what happens here, let's do a couple more things so you can see what it looks like first.
Replace the render() function with the following:
void render()
{
  // Lock surface if needed
  if (SDL_MUSTLOCK(screen))
    if (SDL_LockSurface(screen) < 0)
      return;

  // Ask SDL for the time in milliseconds
  int tick = SDL_GetTicks();

  newsnow();
  snowfall();

  // Unlock if needed
  if (SDL_MUSTLOCK(screen))
    SDL_UnlockSurface(screen);

  // Tell SDL to update the whole screen
  SDL_UpdateRect(screen, 0, 0, 640, 480);
}
Finally, go to the main function and add a call to init(); right before the main loop starts.
Compile and run.
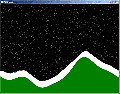
You should have some white pixels falling down through the black pixels and stacking on the green pixels. It doesn't really look like snow, but we'll get to that in a bit. First, let's see what we have.
The 'init' function calculates the 'ground' level using three sin() functions, much like what we did with the 'x' and 'y' coordinates in the previous chapter. The ground is then filled using vertical bars and mid-green color (0x007f00 - 7f hex is 127 decimal, which is about half of 256, 28).
We're assuming SDL starts off with a black screen. If we didn't, we would have to fill out the whole buffer with black first.
The newsnow() function draws eight white pixels on the top row in random places. (Actually, the rand() function supplied with the standard library is rather bad - if you stare at the 'snow' for a while, you may already notice some patterns).
The snowfall() function goes through the whole screen bottom-up, left to right. Whenever it finds a white pixel, it checks whether the pixel under it is black, and if so, moves the white dot down. We're defining a local variable that's pointing to the framebuffer mostly because we'll be accessing the framebuffer a lot here.
So what can we do to make the snow a bit snow-ish? Well, first, the snow around here doesn't stack in straight vertical piles, so let's add a couple of checks. You may have wondered why we're leaving the left and rightmost horizontal pixels alone with our 'snow' - here's why. Replace the innermost 'if' block in the snowfall() function with the following:
if (fb[ypos + i + PITCH] == 0)
{
  fb[ypos + i + PITCH] = 0xffffff;
  fb[ypos + i] = 0;
}
else
if (fb[ypos + i + PITCH - 1] == 0)
{
  fb[ypos + i + PITCH - 1] = 0xffffff;
  fb[ypos + i] = 0;
}
else
if (fb[ypos + i + PITCH + 1] == 0)
{
  fb[ypos + i + PITCH + 1] = 0xffffff;
  fb[ypos + i] = 0;
}
If we hadn't left the left and rightmost column alone, we would be reading and writing outside the screen now (which, as you'll remember, would be a Bad Thing to do).
Note that the speed of this effect is very dependent on the speed of the machine it's run on, and there's also a difference in speed between debug and release builds.
Additional things to try:
- Vary the amount of snowfall.
- Vary the area of the snowfall - check out what happens if it only snows at [rand() % 100 + 350]. Can you fix it?
- Animate the amount and area of snowfall with time.
- Add a cloud with sprites from which the snow falls.
- Play with the landscape generation. Use the sprite drawing code to add more features to the landscape.
- Try adding even more sideways checks for the snow - PITCH + 2 and PITCH - 2
- What happens if you change the traversal from bottom-up to top-down?
- Try adding different colored snow pixels.
- Make it so that even if there is space below the "snowflake", it will swing left and right depending on time and the y-value to simulate drifting.
- Limit the framerate to something sensible.
- Make it so that if a snowflake pixel can't move, its color gets darker until it turns black again.
- Load a picture instead of generating the background.
- Add a sprite that clears out the snow.
Okay, so we've read and written pixels so far. Combining old and new pixel data is rather important in computer graphics, and we'll be doing just that next in 05 - Blending a Bit
Having problems? Improvement ideas? Just want to discuss this tutorial? Try the forums!
Any comments etc. can be emailed to me.