A Brief z80 Assembly Tutorial
Chapter 8
It's time to talk about structure and states. Let's crack open the good old yEd and make some sense of this.
Overall Structure
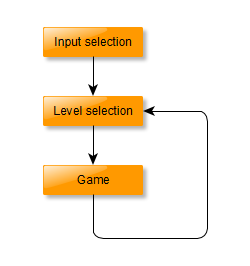
The game will open with a title screen with input selection. If we have the space, we can show a logo here. The screen will just ask the player to press 1, 2 or 3 depending on their input style of choice, which will be stored in the inputmode variable, after which the player is thrown into the level selection.
In the level select the player can browse through the available levels using sideways movement, with a preview of the level and level name shown. Maybe with how many gems were collected. From here, the player gets into the game.
Game States
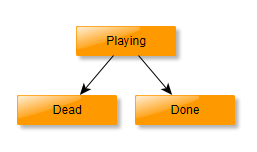
Inside the game, the player can either be actively playing, dead, or done. From game's structure point of view, both of the latter two are identical: keep running simulation, don't accept movement input.
Since it's possible to end up in a situation where you're neither dead nor can move, we'll make it so hitting a button will return us to the level selection. The same can be done in all the game states, so we'll just make it a global option.
There's a bunch of things we need to do, so let's get cracking..
Input Selection
We need a way to tell the player which keys to press to pick the input device. While I'm planning on making a text output routine eventually, we'll just bite the bullet and load a whole screen image. That will cost us 6912 bytes, which sounds nuts in our scale especially for a screen that's seen once at the beginning and then never again.
We could store this in a compressed form in contended memory and use a decompressor (like zx7) to decompress it on the fly, or even load it to display memory from tape before running our binary. For now, though, I think we can just live with it. We still have the room for it..
keyselect_scr:
        INCBIN "keyselect.scr"

I quickly made the image using my image spectrumizer (github). The image isn't great, but it does the job.
        ; Entry: key select

        ld a, 0
        out (0xfe), a

        ld de, SCREEN
        ld hl, keyselect_scr
        ld bc, (256/8)*192+32*24
        ldir
Right after we've set up the ISR, we set the border color to black, and set up registers for LDIR to copy the image to screen, covering both bitmap and attribute area. There's a possibility the bitmap will show before the attributes are done, which could be solved by clearing the attributes to black first, but that's a minor issue.
LDIR is not the fastest way to copy data on the z80, but it's definitely the most compact. Faster ways include having strings of LDI (the R in LDIR is for repeat - LDI does a single step) and abusing the stack.
inputselectloop:
        call scaninputs
        ld a, (keydata + 3)
        bit 0, a
        jr z, select_1
        bit 1, a
        jr z, select_2
        bit 2, a
        jr z, select_3
        jp inputselectloop
select_1:
        ld a, 0
        ld (inputmode), a
        jp levelselect
select_2:
        ld a, 1
        ld (inputmode), a
        jp levelselect
select_3:
        ld a, 2
        ld (inputmode), a
        jp levelselect
Here's one place where the fact that we read all the inputs instead of just what we needed comes in handy. We re-use the scaninputs function to update the keydata array, check if any of the keys 1, 2 or 3 are pressed, update the inputmode variable as appropriate and jump to level select.
Level Selection
map:
        BLOCK 16*12,0

levels:
        db 2,2,6,3,5,2,2,2,2,2,2,2,2,2,2,2
        db 2,5,6,3,2,2,6,2,2,2,2,2,2,2,2,2
        ...
For level select to make sense, we need separate map and level storage. This change is simple enough. We still have just one level, though. I initialized the map as a block of zero bytes.
levelselect:
ld a, 0
ld (movekey), a
ld a, 0
out (0xfe), a
; clear screen
ld hl, SCREEN
ld (hl), 0
ld de, SCREEN + 1
ld bc, (256/8)*192+32*24 - 1
ldir
ld de, map
ld hl, levels
ld bc, 16*12
ldir
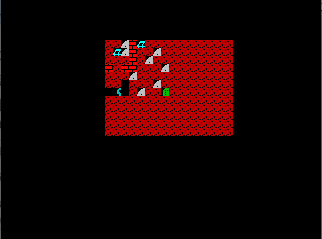
call drawminimap
At the start of the level select we clear the movekey to avoid any keys from being used from a previous state. Keydown is not cleared, so if the user is pressing a key, it won't get triggered before they release the key. We then clear the screen by writing a single zero to the first byte of the screen and then copy this over the rest of the screen using LDIR again, thus showing that LDIR is both memcpy and memset.
Then we "load" the level to the map using LDIR again, and call drawminimap before going into level selection loop. We'll look at the minimap thing in a moment.
levelselectloop:
        call scaninputs

        ld a, (movekey)
        bit 4, a
        jr z, levelselectloop


        ld a, 0
        ld (movekey), a

        call findplayer
        ld (playerpos), hl
        call dirtymap
mainloop:
We don't do much in the way of actually selecting a level yet, but we do call scaninputs again to see if the user has hit the mysterious 5th key, which is space, in which case we prepare the level for play by calling findplayer and dirtying the map, and falling through to the main loop.
We also make sure to clear the movekey so any depressed buttons don't get used right away in the game. One of these keys is also space which returns us to level select, so the game would just return right back here.
Checking for Space
SCANKEY 7,0,4 ; space
To let the player move between the level select and game modes there's a new key, space, which needs to be checked in the scaninputs function. This is the same key for all input methods, so the check appears right after the keydata is updated. This also means that the SCANKEY macro had to move a bit, but remains unchanged.
moveplayer:
        ld a, (movekey)
        bit 4, a
        jp nz, levelselect
At the start of moveplayer we check for this and jump back to levelselect if space was pressed.
Drawing the Minimap
There's tons of code here, but it's all familiar, largely copy-paste from earlier code.
; Draw mini-map for the level selection
drawminimap:
        ld hl, map + (16 * 12 - 1)
        ld bc, 0x100c ; 16x12
minimaploop:
        ld a, (hl)
        push hl
        push bc

        ld l, a
        ld h, 0

        push hl
        ld hl, bc
        ld de, 0x0801
        add hl, de
        ld bc, hl
        pop hl

        call drawminitile
        pop bc
        pop hl

        dec hl
        dec b
        jp nz, minimaploop
        ld b, 0x10
        dec c
        jr nz, minimaploop
        ret
Drawminimap is actually just simplified version of our map drawing loop, with the dirty flag check removed. The draw offset is also changed so that the minimap, which is 1/4 of the actual, is drawn centered horizontally. To minidraw the minimap we minicall the drawminitile in our minimaploop.
; drawminitile, copies tile data to screen
; input: hl = tile, b = x, c = y
; destroys de, hl, bc, a
drawminitile:
        ; Save these for later when we plot color
        push hl
        push bc
        ; One tile is 2*16 bytes
        add hl, hl ; *2
        add hl, hl ; *4
        add hl, hl ; *8
        add hl, hl ; *16
        add hl, hl ; *32
        ld de, tiles
        add hl, de
        ld de, hl  ; hl now is pointing at the start of tile x
Since we don't have separate minitiles yet, we just draw the first 8x8 of the tiles we do have. We'll revisit this function once we have the new assets for the minimap.
        ; Figuring out the screen coordinates is trickier;
        ; screen coordinate bits go like this:
        ;           H          |            L
        ; 0 1 0 Y7 Y6 Y2 Y1 Y0 | Y5 Y4 Y3 X4 X3 X2 X1 X0
        ; rotate the coordinate right three bits (to get to Y3, Y4, Y5 in L)
        ld a, c
        rrca
        rrca
        rrca
        ; AND any additional bits off
        and 0xe0
        ; Add x
        add a, b
        ld l, a  ; coordinate bottom byte done
        ; next we do the same for Y6 and Y7; no need to shift because we're in the
        ; right place.
        ld a, c
        and 0x18 ; AND extra bits off, and h is done.
        ld h, a
        ld bc, SCREEN
        add hl, bc  ; now hl points at the screen offset we want
All of this should be familiar from the full-scale drawtile. All we've changed here is that instead of drawing 16x16 tiles we're drawing 8x8 ones, so we don't need to add the x and y coordinates twice.
        ; Instead of looping, we'll plot each pixel separately..
        DUP 7
            ld a, (de)    ; Read pixels from data
            ld (hl), a    ; Write to screen
            inc de        ; Increment de and hl..
            inc de
            inc h
        EDUP
            ld a, (de)    ; Read pixels from data
            ld (hl), a    ; Write to screen
And we only need to draw 8 bytes to get the bitmap to the screen, simplifying things here too. We still need to increment DE a couple of times since our source tile data is oversized.
        ; Bitmap done, color to do
        pop bc
        ld l, c   ; y coordinate
        ld h, 0
        ; we need to multiply y by 32; 32 colors per scanline
        add hl, hl ; x2
        add hl, hl ; x4
        add hl, hl ; x8
        add hl, hl ; x16
        add hl, hl ; x32
        ld c, b
        ld b, 0
        add hl, bc ; x offset
        ld bc, COLOR
        add hl, bc
        ld bc, hl ; bc now has color table offset
The color pointer setup is unchanged apart from the 16x16->8x8 change.
        pop hl ; tile index
        ; One tile is 4 bytes of color
        add hl, hl ; x2
        add hl, hl ; x4
        ld de, tilecolors
        add hl, de  ; hl now points at tile color

        ld de, hl  ; de now points at tile
        ld hl, bc  ; hl now points at screen
And of course the tile offset calculation is completely unchanged, making the actual data transfer part pretty small in comparison..
        ld a, (de)      ; read color
        ld (hl), a      ; write color

        ret
Yup, that's it.
That takes care of the overall structure of the game. We still need the mini-tile assets, several levels and a way to pick between them. We also haven't dealt with game state yet, as simple as that is.
This chapter's version of the source as well as the keyselect.scr file is available here.
We're at 9197 bytes. Ick. Well, 6912 bytes of that is the image we included, but apart from that we grew by 488 bytes. That consists mostly of the duplicated map/tile draw functions as well as the empty map array. Still, we have 2/3 of the space we can use left, so we're doing fine.
Next up we'll keep filling that space with some new assets.
Any comments etc. can be emailed to me.